How to Install Solar Panels on a Flat Gravel Roof in 2026?

Time:2026-11-16 Author:Mason
0%

How to install solar panels on a flat gravel roof? The answer begins with the roof, not the panels. Gravel can conceal a delicate membrane, uneven spots, or drainage paths that must stay clear. A careful assessment checks the roof’s age, structure, slopes, drains, and existing equipment. It also confirms whether the roof can support the system’s weight and local wind forces. Small details matter. A blocked drain can turn a sunny upgrade into a costly repair.

Energy expert Amory Lovins is often quoted as saying, “The cheapest energy is the energy you don’t use.” That principle is not a mounting specification, but it is a useful reminder to size a system around real energy needs. For a flat gravel roof, the installation plan may use engineered ballasted racks, approved roof attachments, or a combination. The right choice depends on structural calculations, roof-covering requirements, and site conditions—not guesswork. Gravel may need careful clearing beneath supports, while safe walkways, cable routes, and access for maintenance must remain practical. Nothing should compromise drainage.

This 2026 guide explains how to compare mounting options, prepare the roof, and coordinate qualified solar and roofing professionals. It also covers permits, inspections, electrical connections, and commissioning. No roof is perfectly simple. Even a sound-looking surface can hide a weakness, so an on-site review matters more than a generic diagram. The aim is a secure, serviceable system that protects the roof as well as producing power.
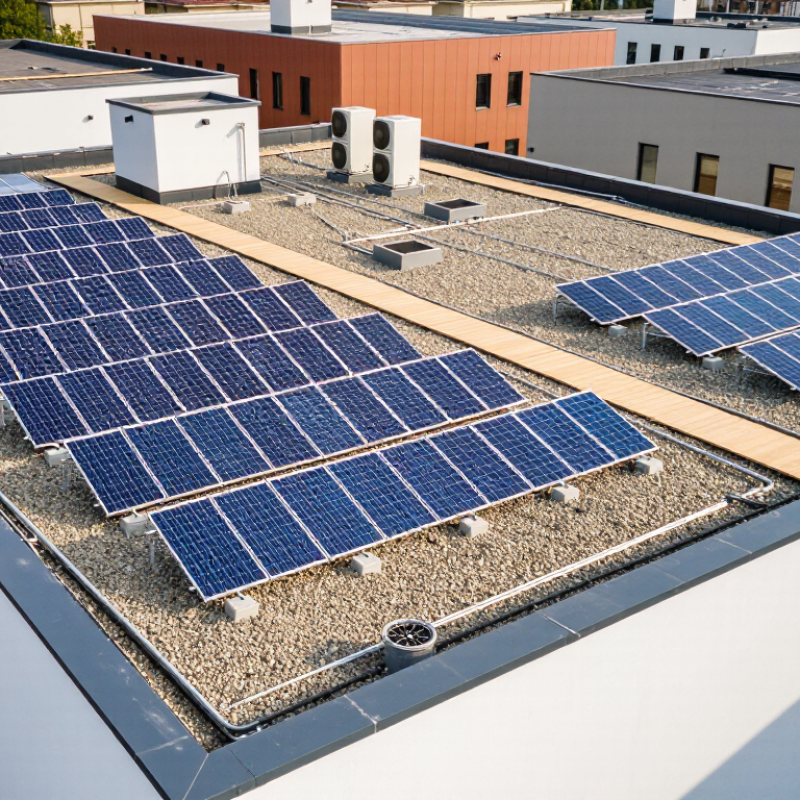
How to Install Solar Panels on a Flat Gravel Roof in 2026?

Assess the Roof Structure, Gravel Layer, and Site Conditions

Before placing panels on a flat gravel roof, confirm what lies beneath the stone. Ask a structural engineer to review the deck, joists, connections, and existing loads. NREL’s Solar Ready Buildings Planning Guide gives a typical rooftop PV system load of about 3–6 pounds per square foot; the actual assembly can differ. Gravel adds weight too, and uneven depth can hide concentrated loads. Measure it. Check for soft spots, ponding, cracked seams, and signs of leaks, especially near drains and roof edges. I would not trust a visual check alone.

The gravel layer affects attachment, drainage, and maintenance access. A qualified roofer can identify the membrane type and confirm whether mounting methods suit it without trapping water or damaging the surface. Record gravel depth and roof age, then compare them with the roof’s remaining service life. Small details matter.

Site conditions matter as well: nearby trees, parapets, and taller buildings can create shade or wind turbulence. Use local wind and snow design values from ASCE 7-22, and review NOAA’s 1991–2020 Climate Normals for local weather patterns. These records inform the assessment, but they do not replace a site survey. One uncertainty remains: old repairs may conceal weak areas, so document what you cannot verify before selecting a mounting layout.

Choose a Compliant Solar Mounting System and Plan the Array

On a flat gravel roof, choose the mounting system before fixing the panel layout. The roof’s structure, membrane, drainage, and local wind and snow loads all matter. Ballasted systems can add substantial weight; penetrating mounts need carefully detailed waterproofing. Ask a qualified solar professional and roofing specialist to review dead load, wind uplift, point loads, and membrane protection. UL 2703 listing addresses electrical bonding and grounding, but does not replace structural approval. The details matter.

Array planning should begin with a roof survey. Mark drains, parapets, equipment, access paths, and areas of afternoon shade. Then compare row spacing and tilt against the site’s sun exposure and maintenance needs. NREL’s 2016 report, Rooftop Solar Photovoltaic Technical Potential in the United States, estimated 1,118 gigawatts of rooftop capacity and 1,432 terawatt-hours of annual generation. That is a national technical estimate, not a guarantee for an individual roof. I would question any tidy layout that places panels over a drain.

Tips: Take roof measurements after locating drains and rooftop equipment. Request a shade study and a structural review before approving the final plan. Leave practical access for inspections; a few missed details can become expensive later.

Prepare the Roof and Secure the Mounting Components

On a flat gravel roof, preparation starts with a close inspection, not panel placement. Have a qualified roofer check the membrane, seams, drains, and signs of trapped moisture. Remove loose gravel from each planned support area, then place compatible protective pads without scraping the membrane. Keep drainage paths clear. A drain hidden behind a support can become an expensive surprise.

Lay out the array around roof edges, access routes, and drainage. Mounting supports must suit the roof assembly and local wind conditions; ballast weight alone is not a safe guess. Ask a structural professional to verify roof capacity and an experienced installer to confirm the design. Follow the mounting-system specifications for ballast, anchors, and spacing.

NREL’s review of nearly 2,000 reported photovoltaic degradation rates found a median decline of about 0.5% per year. That long service horizon makes a sound roof and accessible maintenance routes especially important. Small details matter. Still, gravel can shift after installation, so inspect support pads and drainage after the first strong wind or heavy rain.

Tips: Photograph the membrane before work, mark drains on the layout, and keep a small gravel-free inspection zone around each drain. If the roof feels soft, stop and request a professional assessment.

Install the Panels, Wiring, and Electrical Connections

Once the support layout is approved, clear loose gravel from each contact point without exposing or damaging the roof membrane. Set the mounting supports in position, then check spacing, level, and stability before placing the panels. Ballasted systems need a design suited to the roof structure and local wind conditions; extra weight is not a guesswork fix. Gravel shifts more than expected, and that detail is easy to underestimate.

Lift each panel carefully and secure it according to the mounting system’s instructions. Keep a consistent gap between modules, and make sure clamps hold the frame rather than pressing on the glass. Route cables beneath the panels, away from sharp edges and standing water. Use suitable clips to prevent movement in wind, and leave enough slack for thermal expansion without letting cables touch the roof. Small details matter.

Connect the module wiring with compatible, dry connectors, keeping polarity consistent across the array. Do not leave unused connectors exposed to moisture or gravel. Never improvise connections. Before energizing the system, a qualified solar electrician should check grounding, bonding, cable protection, and inverter connections, then test the array for correct voltage and continuity. I would still recheck every cable route after the final panel is secured; a neat appearance does not prove a safe connection.

Inspect the System and Establish Ongoing Maintenance Checks

After installation, inspect the array at least once a year and after severe storms. Check that ballast blocks remain secure, gravel has not shifted against panel edges, and roof drains are clear. Look for loose cable clips, cracked insulation, corrosion, and water pooling near roof penetrations. Do not assume the panels are fine because they still produce power. NREL’s Best Practices for Operation and Maintenance of Photovoltaic and Energy Storage Systems recommends documented preventive maintenance and performance monitoring.

Tips: Photograph the same roof areas each visit. Compare inverter data with previous months, allowing for seasonal changes. If output drops unexpectedly, ask a qualified technician to investigate before cleaning or moving equipment yourself.

Keep a simple inspection log with dates, weather, photos, and repairs. Jordan and Kurtz’s 2013 review in Progress in Photovoltaics analyzed nearly 2,000 reported degradation rates and found a median of about 0.5% per year. That is a fleet-wide figure, not a promise for every system. A sudden decline deserves attention. Check the roof membrane around supports, too; small defects can be easy to overlook beneath gravel. Repair records matter. The schedule may need adjustment for local wind, dust, and snowfall.

How to Install Solar Panels on a Flat Gravel Roof in 2026? - Inspect the System and Establish Ongoing Maintenance Checks

Inspection stage What to check How to check Suggested timing Acceptable condition and follow-up
Before installation Roof condition, load capacity, waterproofing, drainage, and existing warranties Have a qualified roofing professional assess the roof and a qualified structural professional review applicable loads. Confirm mounting details with the roof-system requirements. Before design approval and material delivery Proceed only when the roof is suitable and the mounting approach is documented. Resolve leaks, deterioration, or drainage problems first.
Layout and drainage Panel clearances, access paths, roof drains, scuppers, and equipment access Compare the installed layout with the approved plan. Check that gravel, supports, and wiring do not obstruct drainage or required access. During installation and at handover Drains and access routes remain clear; panels and equipment match the approved layout. Correct obstructions promptly.
Gravel and support points Gravel displacement, support-pad contact, roof-surface damage, and signs of settlement Visually inspect accessible areas around supports. Confirm gravel has not been piled against equipment or swept into drains. At handover and during routine roof checks Supports sit as designed, with no visible membrane damage or unusual movement. Have a roofing professional assess suspected damage or settlement.
Mounts and panel structure Visible movement, loose or missing components, corrosion, and panel damage Inspect from a safe location without climbing on or disturbing the array. Do not tighten hardware unless the approved instructions specify the method and torque. At handover, seasonally, and after severe weather No visible shifting, broken parts, or damaged modules. Arrange qualified service for any concern; do not walk on modules.
Electrical components and wiring Visible cable damage, loose-looking connections, exposed conductors, warning lights, and equipment faults Check the monitoring system and visually inspect accessible equipment from a safe distance. Do not open electrical enclosures or touch damaged wiring. At handover and as part of regular monitoring No visible damage or unresolved system alerts. Contact a qualified solar-electric professional for faults, exposed wiring, or unusual heat, odor, or noise.
System performance Energy production, inverter status, and changes from expected output Review monitoring data and compare similar periods, taking weather, season, shading, and system settings into account. Monthly or at the monitoring interval recommended for the system Investigate persistent unexplained drops or repeated alerts with a qualified service provider; a single low-output day may reflect weather or shading.
Roof drains and surface condition Blocked drains, standing water, displaced gravel, ponding, and signs of leakage below the roof Inspect roof drainage points from a safe, authorized access route and check interior areas for new water stains. Seasonally and after heavy rain, snow, or wind Drainage paths remain open and there are no signs of leaks. Use a qualified roofing professional to address ponding or suspected membrane damage.
Annual professional review Roof condition, mounting system, wiring condition, equipment operation, and maintenance records Schedule a review by appropriately qualified roofing and solar-electric professionals, following the system and roof manufacturers’ instructions. Annually, or more often if required by the roof or system documentation Record findings, repairs, and unresolved issues. Keep inspection reports, permits, warranties, and maintenance records together.

Safety note: Roof access and electrical work should be handled only by people with appropriate training, equipment, and authorization. Follow local codes, approved project documents, and the roof and system manufacturers’ instructions.

FAQS

What should I check before planning panels on a flat gravel roof?

Survey the roof and mark drains, parapets, equipment, access paths, and shaded areas. Check the membrane and roof structure, too. Details are easy to miss.

How do I choose between ballasted and penetrating mounts?

Ballasted systems add weight, while penetrating mounts require carefully detailed waterproofing. A qualified solar professional and roofing specialist should review the roof before you choose.

Can I assume the roof can support the mounting system?

No. Ask a structural professional to assess dead load, wind uplift, and point loads. Ballast weight alone is not a safe estimate.

How should I protect the roof membrane during installation?

Have a roofer inspect seams, drains, and possible trapped moisture. Clear loose gravel from support areas, then use compatible protective pads. Avoid scraping the membrane.

How much space should I leave around drains?

Keep drainage paths clear and leave a gravel-free inspection zone around each drain. I would question any layout that puts a support over one.

What should I consider when arranging panel rows?

Compare row spacing and tilt with sunlight, shading, and maintenance needs. Leave practical access routes for inspections. A neat layout is not always a useful one.

What should I do if the roof feels soft?

Stop work and request a professional assessment. Do not place supports there until the roof’s condition and capacity have been checked.

When should I inspect the supports and drainage again?

Check support pads and drainage after the first strong wind or heavy rain. Gravel can shift. It is an easy detail to overlook.

Conclusion

Installing solar panels on a flat gravel roof in 2026 begins with a careful assessment of the roof structure, waterproofing, gravel depth, drainage, shading, and local weather conditions. Confirm that the roof can support the system’s weight and wind loads before choosing a mounting approach. The question “How to install solar panels on a flat gravel roof?” is best answered with a plan that protects the roof while keeping the array stable, well-spaced, and accessible for inspection.

Once the layout and a suitable, code-compliant mounting system are selected, clear only the necessary work areas and secure the mounting components according to the system design. Install and connect the panels, wiring, and electrical equipment using qualified professionals where required. Before putting the system into service, inspect the mounts, roof surface, cable routing, grounding, and electrical connections. Establish a maintenance schedule to check for loose components, debris, drainage problems, and changes in system performance.

Mason

Mason

Mason is a seasoned marketing professional with a deep expertise in the company's offerings and a passion for driving brand awareness. With a strong background in digital marketing strategies, he has an innate ability to connect with diverse audiences and effectively communicate product benefits.......