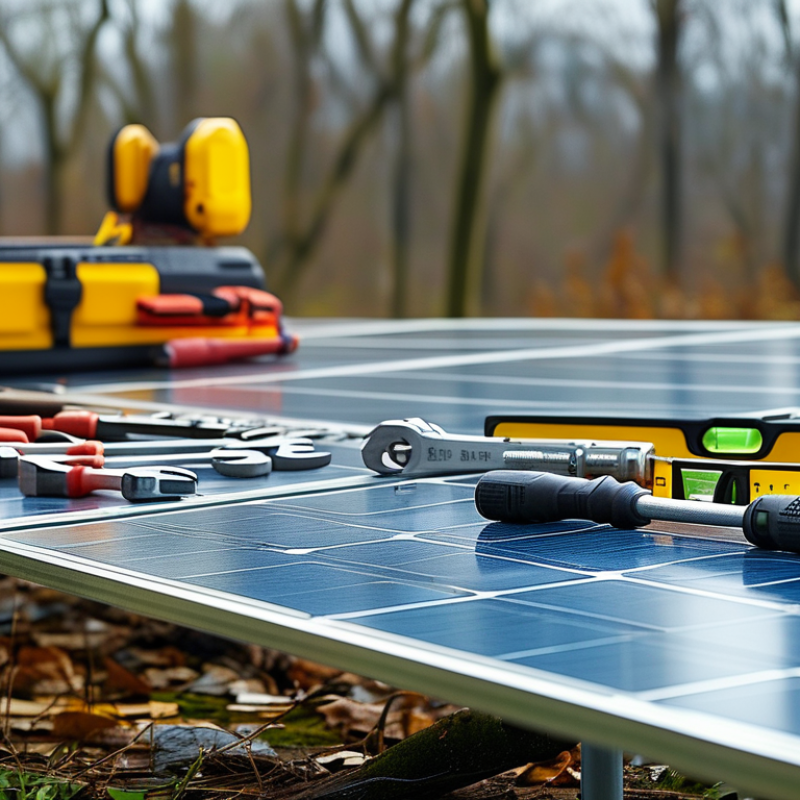
As the demand for renewable energy grows, solar ground mounts are becoming essential for effective solar installations. Understanding "What tools are required for assembling a solar ground mount?" is crucial for both professionals and DIY enthusiasts. According to Dr. Emily Hart, a solar energy expert from Eco Innovations, “The right tools make the process efficient and safe.”
The assembly of solar ground mounts necessitates a range of tools, including wrenches, drills, and levels. Each tool plays a vital role in securing the structure and ensuring proper alignment. For instance, a high-quality torque wrench guarantees that bolts are tightened to the manufacturer’s specifications. Yet, many newcomers overlook tool selection, which can lead to delays and safety issues.
While expertise is essential, mistakes can happen. A miscalculated measurement or improper tool use might compromise the installation. Reflecting on these potential pitfalls allows for a more thoughtful approach. Setting aside time to choose the right tools can make the assembly smooth and successful.
Essential Tools for Solar Ground Mount Assembly: Overview
When installing a solar ground mount system, having the right tools is crucial. Basic hand tools, like wrenches and screwdrivers, play a pivotal role. They help in tightening bolts and securing panels. However, experiences often reveal that the quality of the tools matters significantly. Low-quality tools can lead to mistakes or delays.
Heavy-duty equipment is also necessary. For instance, a post-driver can make setting the mounts easier and quicker. It reduces the physical strain on the installer, which is often overlooked. Safety gear is equally important. Wearing gloves and safety goggles prevents injuries during the installation process. Yet, many installers forget these simple precautions.
Unexpected challenges may arise, such as uneven terrain. This necessitates the use of leveling tools. A well-leveled ground is critical for optimal solar panel performance. Additionally, proper planning and organization of tools can enhance efficiency. Arranging tools in a logical order reduces search time and maintains focus. Reflecting on past installations can inform better practices. Each assembly provides lessons, which can lead to improved methods in future projects.
Understanding Solar Ground Mount Structures and Their Components
When assembling solar ground mount structures, understanding the components is crucial. These structures typically include posts, brackets, and rails. Each part plays a role in supporting solar panels. The installation process requires careful planning and precise execution to ensure stability and efficiency.
Tip: Always check the soil conditions before installing posts. The soil needs to support the weight of the structure and panels. Sometimes, rocky or unstable ground can complicate the installation.
Components like clamps and support beams also matter. They secure the solar panels in place. Choosing the right materials is essential to withstand harsh weather. It might be tempting to cut costs, but lower quality materials can lead to larger problems down the line.
Tip: Consider a professional assessment if you’re unsure about the assembly. Having expert advice can prevent costly mistakes. It’s wise to take every step seriously, as improper installation can lead to panel misalignment and reduced energy capture.
Essential Tools for Solar Ground Mount Assembly
Must-Have Tools for Preparing the Site for Installation
When preparing a site for solar ground mount installation, having the right tools is crucial. The U.S. solar market is projected to grow at a compound annual growth rate of 20.5%. This growth emphasizes the need for efficient site preparation. Essential tools include a laser level for precise alignment. It helps ensure that the panels are installed correctly and at the optimal angle.
Soil testing kits are another must-have. They assess soil conditions and determine the stability of the site. Roughly 40% of solar project delays are due to unforeseen site conditions. Addressing these issues during preparation can save time and costs later. Additionally, hand tools like post drivers and concrete mixers aid in securing mounts. They enable faster assembly while maintaining high standards.
Safety equipment cannot be overlooked, either. According to data, nearly 25% of all job-related injuries occur during installation. Proper gear, including hard hats and gloves, reduce risks significantly. This combination of tools and safety measures ensures a successful and efficient installation process. Reflecting on the preparation phase can often reveal oversights that affect project timelines and overall success.
Essential Tools for Solar Ground Mount Assembly
| Tool Name |
Purpose |
Quantity Needed |
Estimated Cost ($) |
| Shovel |
Digging holes for posts |
2 |
20 |
| Post Hole Digger |
Setting ground mount posts |
1 |
30 |
| Level |
Ensuring posts are vertical |
1 |
15 |
| Wrench Set |
Tightening bolts and nuts |
1 |
25 |
| Concrete Mix |
Securing posts in place |
4 bags |
80 |
| Measuring Tape |
Measuring distances accurately |
1 |
10 |
| Safety Gear |
Protecting workers during assembly |
1 set |
50 |
Step-by-Step Guide to Assembling Solar Ground Mount Systems
Assembling a solar ground mount system can seem daunting. However, with the right tools and knowledge, it becomes manageable. To begin, gather essential tools like a power drill, socket set, and a level. A concrete mixer may be necessary if your installation requires a secured base. Each tool plays a vital role in ensuring stability and reliability.
Begin by marking the layout for your system. Use stakes and string to outline the exact placement of the mounts. Afterward, use the power drill to create holes for the anchors. Pay attention to the dimensions; improper measurements can lead to misalignment. It's crucial to compare measurements multiple times throughout the process.
Once the mounts are in place, secure them with bolts and double-check for level. Adjustments might be needed here. It’s common for some parts not to fit perfectly the first time. This step requires patience and sometimes, trial and error. Ultimately, the goal is to create a sturdy foundation that will support solar panels efficiently. Proper installation ensures maximum sunlight absorption and longevity of your solar system.
Safety Equipment and Best Practices for Solar Installation
When assembling solar ground mounts, safety is paramount. The National Solar Industry Association reports that safety incidents can increase project costs by up to 15%. Proper safety equipment and practices are essential for minimizing risks on site. Every worker should wear personal protective equipment (PPE) including hard hats, gloves, and safety glasses. Ensuring that these items fit well and meet industry standards can be a game changer for worker safety.
It is crucial to perform regular safety checks on equipment. For instance, ladders or lifts should be inspected before use. The Occupational Safety and Health Administration (OSHA) states that most fall accidents can be prevented through adequate training and ongoing education. Workers should be trained on how to set up and use equipment correctly. This practice not only enhances safety but also increases efficiency in the installation process.
Tip: Always establish a communication plan on site. Clear communication can help prevent accidents. Team members should use hand signals or radios to ensure everyone is aware of ongoing activities.
Tip: Evaluate potential hazards regularly. Conducting daily safety briefings can keep potential dangers at the forefront of workers' minds. Engaging the team in these discussions fosters a culture of safety that benefits everyone involved.
Conclusion
When considering the assembly of a solar ground mount, it's essential to understand the structure and components involved. Knowing what tools are required for assembling a solar ground mount is crucial for a successful installation. The must-have tools include basic hand tools, measuring equipment, and specific installation equipment tailored for the chosen ground mount system.
Preparing the site is a vital step that entails clearing the area and ensuring proper ground conditions. Following a detailed step-by-step guide can greatly facilitate the assembly process, ensuring each component is securely installed. Furthermore, employing appropriate safety equipment and adhering to best practices for solar installation will not only protect the installers but also enhance the longevity and performance of the solar system. Overall, a well-prepared approach and the right tools are key to effective solar ground mount assembly.