Installing expansion bolts in concrete is crucial for solar rack stability. Experts emphasize the importance of getting this right. John Thompson, a civil engineer with over 15 years of experience, asserts, "Properly installed expansion bolts can make or break the structural integrity of solar systems."
When considering "How to install expansion bolts in concrete for solar racks?", attention to detail is essential. Ensuring correct hole diameter and depth matters significantly. Many overlook the need for precise measurements, leading to potential failures later on. The environmental conditions can also impact the installation process.
It's a daunting task for some. Many installers feel uncertain about the type of expansion bolt to use. Knowing the right tools and techniques can save time and enhance safety. However, not following guidelines can lead to issues like rust or inadequate hold. Reflecting on the installation process allows for improvements in future projects, ensuring better outcomes for solar energy systems.
When installing solar racks, understanding expansion bolts is crucial. These bolts secure structures to concrete and other solid surfaces. Various types of expansion bolts are available, including wedge anchors and sleeve anchors. Each type has distinct uses depending on the load and the environment. Wedge anchors provide high strength and are ideal for heavy solar installations. Sleeve anchors are versatile and suitable for lighter loads.
Using the wrong bolt can lead to failures. It's essential to assess the specific conditions of the installation site. Also, ensuring proper installation is vital for durability. An expansion bolt must be installed at the correct depth. A miscalculation can compromise the entire system's stability.
While expansion bolts are often reliable, mistakes can happen. An improper fit can result in weakened connections. Regular inspection and maintenance can mitigate risks. Observing wear and tear will prevent future issues. It's crucial to choose the right bolts and install them correctly. This attention to detail ensures that solar racks remain secure and efficient over time.
When installing expansion bolts for solar racks, having the right tools and materials is crucial. A standard set includes a drill, masonry bits, and expansion bolts themselves. You’ll also need a torque wrench to ensure secure fittings. These tools are often available at home improvement stores. However, you must verify their compatibility with your specific installation needs.
Beyond tools, the materials you choose play a significant role. High-quality expansion bolts made of corrosion-resistant materials are essential for outdoor installations. Consider the type of anchors that fit your solar rack structure. If unsure, consult with a local expert. It’s not uncommon to face challenges during installation. Misalignment can happen even with proper tools, so double-check measurements before drilling.
Lastly, remember to wear safety gear. Gloves and goggles protect you from potential injuries. Despite preparation, obstacles may arise. Be ready to adapt your approach if issues occur. The method may not be perfect every time, but learning from those moments can enhance your technique. Engaging with solar installation forums can provide insights and improve your skills.
Preparing the installation site for expansion bolts is crucial when installing solar racks. A well-prepared site ensures stability and longevity of the solar installation. According to industry reports, over 30% of installation issues arise from inadequate site preparation. This highlights the importance of thorough planning.
Begin by assessing the foundation material. Concrete or solid rock is ideal for expansion bolts. Loose soil can lead to a failure of the installation. Use a core drill to inspect the depth of the concrete. The recommended depth for expansion bolts is at least 4 to 6 inches. If the concrete is too shallow, consider alternatives to ensure the bolts are secure.
Next, clean the area where the expansion bolts will be placed. Remove any debris, dust, or oil that could interfere with bolt placement. Ensuring a clean surface maximizes the expansion of the bolts during installation. In a survey by the Solar Energy Industries Association, 25% of installations faced delays due to poor site conditions. These numbers emphasize that even minor oversights can lead to significant setbacks and added costs in solar projects. Be precise and diligent in each step to avoid complications.
When it comes to installing solar racks, the use of expansion bolts is crucial. Properly securing these systems ensures longevity and stability. According to industry reports, inadequate installations can lead to structural failures. Therefore, understanding the installation techniques is vital.
Firstly, choose the right type of expansion bolt for your project. Not all bolts suit every situation. For example, sleeve anchors work well in concrete, while wedge anchors provide better grip. Ensure your bolts meet the required load specifications. The American Concrete Institute suggests that bolts must handle at least 25% more load than expected.
During installation, achieving the correct depth is essential. The bolt needs to penetrate the material adequately. Too shallow an insertion can lead to failure. Before drilling, check for hidden utilities to prevent accidental damage.
**Tips:** Always use a torque wrench. This ensures you apply the right force without over-tightening. Over-tightening can strip threads or damage the material. Also, confirm that the hole diameter matches the bolt specifications. An incorrectly sized hole compromises the expansion process.
Regularly inspect your installations. Check for signs of corrosion or wear, especially after severe weather. Studies show that maintenance can extend the lifespan of solar rack systems significantly. This proactive approach can save costs in the long run.
When installing expansion bolts for solar racks, safety should be a priority. Always wear appropriate personal protective equipment, such as gloves and safety goggles. Ensuring a secure working environment is crucial. Make sure the area is clear of any obstacles that could pose a danger. Consider the weather conditions; avoid installation during high winds or storms.
Before starting the installation, double-check the drill specifications for the concrete. Using the wrong drill bit can lead to improper expansion. It's essential to follow the manufacturer's instructions for the bolt installation process. Misalignment can result in weak connections. Always test the bolts after installation to ensure they are secure.
After installation, inspect the bolts periodically. Environmental factors can lead to wear over time. Don’t hesitate to replace any that show signs of damage or loosening. Learning from previous mistakes is vital. Document any challenges faced during installation to improve future practices. Emphasizing safety and quality will yield better results and enhance the longevity of your solar racks.
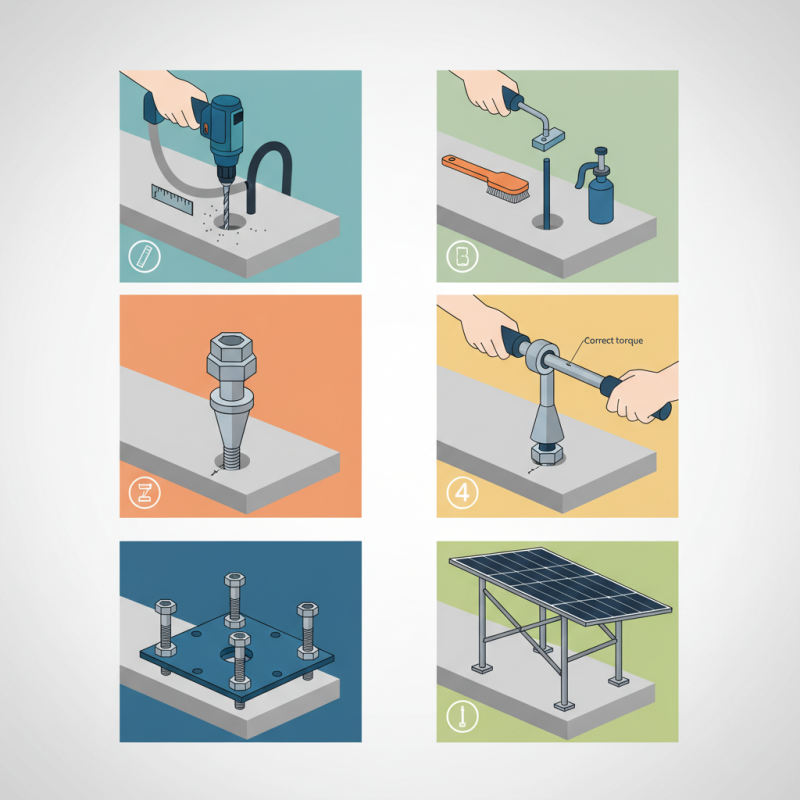
: You need a drill, masonry bits, a torque wrench, and expansion bolts.
Proper site preparation ensures stability and can prevent over 30% of installation issues.
Concrete or solid rock is ideal. Loose soil can cause installation failure.
The recommended depth is at least 4 to 6 inches for secure installation.
Clean the area of debris, dust, or oil to maximize bolt expansion.
Always wear gloves and safety goggles, and keep the area clear of obstacles.
Periodically inspect the bolts for wear or loosening and test their security.
Weather conditions and drill specifications can impact installation quality.
Documenting challenges can enhance skills and lead to better results later.
Yes, misalignment and improper drill bits can create significant issues.
This article serves as a comprehensive guide on how to install expansion bolts in concrete for solar racks. It begins by explaining the various types of expansion bolts available, along with their specific uses in solar rack installations. Readers will find essential tools and materials listed that will facilitate a smooth installation process. The article then provides a step-by-step approach to preparing the installation site, ensuring all necessary measures are taken before proceeding.
Further, it details techniques for the proper installation of expansion bolts within solar rack systems, emphasizing the importance of accuracy and stability. Safety precautions and best practices are highlighted throughout to ensure a secure and efficient installation process. By following this guide, individuals can confidently tackle the task of installing expansion bolts, enhancing the durability and effectiveness of their solar rack systems.
Trope Solar